Webhook alerts
A webhook is an HTTP-based callback function that allows lightweight, event-driven communication between two application programming interfaces (APIs).
What is a webhook?
A webhook is an HTTP-based callback function that allows lightweight, event-driven communication between two application programming interfaces (APIs). Events, such as adding a new customer, deleting a customer, and usage limit exceeded are raised on a source system, and destination systems hooked or subscribed to the events receive a payload of data. In our case, Zenskar is the source system that will send payload of data to all destination systems hooked or subscribed to events.
Three primary components are required for webhooks to function:
- Endpoint URL: the destination endpoint where the payload will be transmitted from Zenskar via a
POSTHTTP method. - Subscribed events: the events that the destination system is hooked on to.
- Secret key: to ensure that your system only processes webhook payloads delivered by Zenskar, and to ensure that the delivery was not tampered with, you should validate the webhook signature before processing the payload further.
Securing the secret key
You must store your secret key in a secure location that only your system can access. You must never hardcode a key into an application or store a key in any source code repository.
Creating a webhook
- Click on the drop-up menu at the bottom left with your name.
- Click on the Webhook Alerts tab on the Settings page.
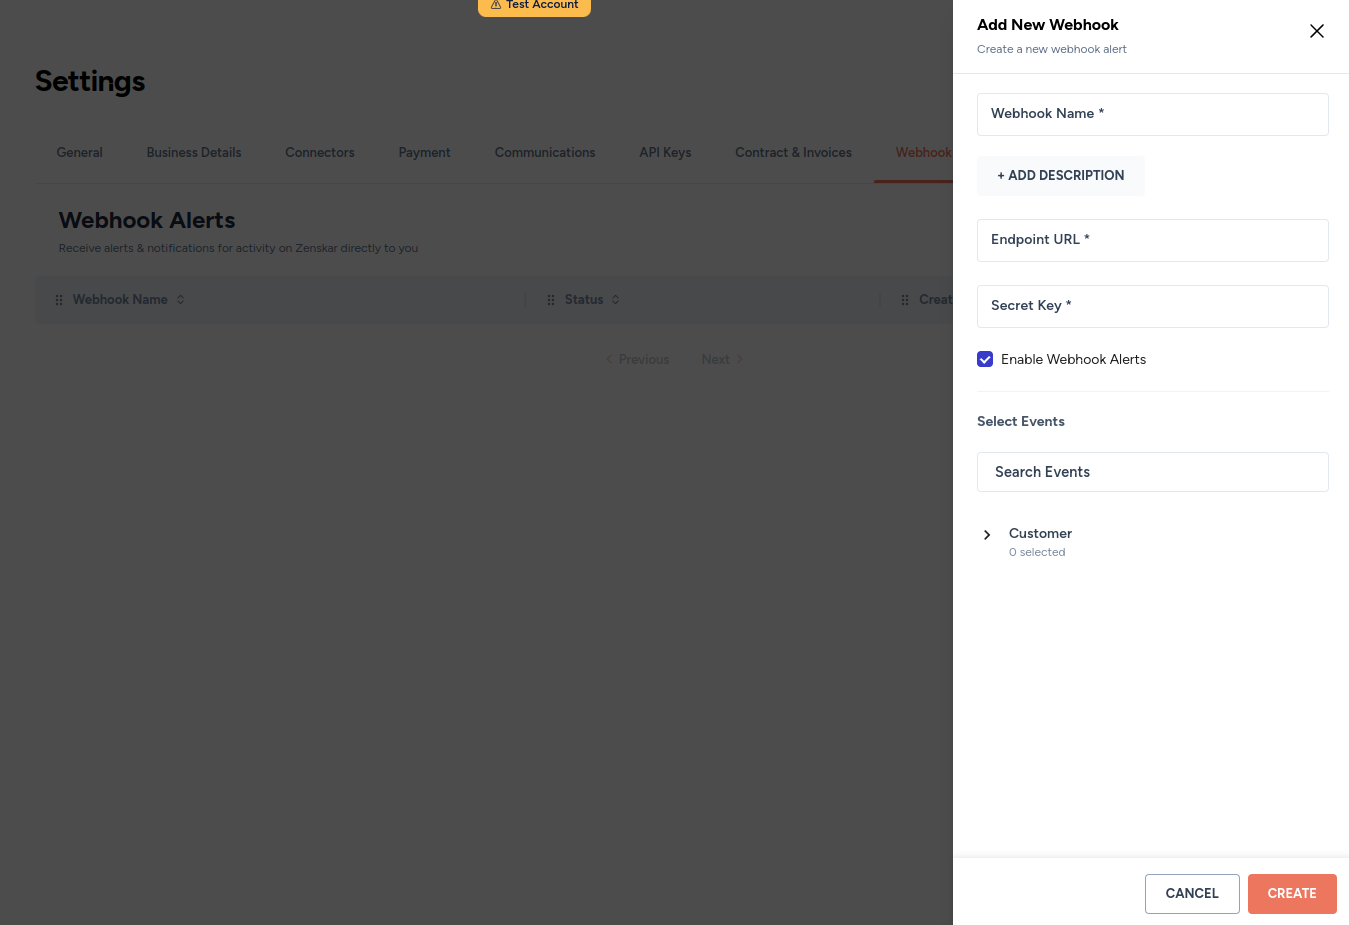
- Click on the + ADD WEBHOOK ALERT button on the Webhook Alerts page.

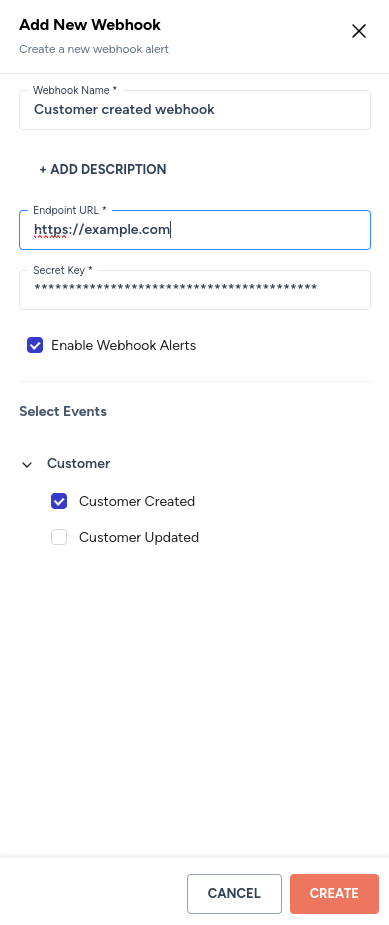
- Fill in the details on the following page:

- Details:
- Webhook name: input any desired name for the webhook
- Add description (optional): add a description
- Endpoint URL: the address URL of the destination system where Zenskar will send event data using
POSTHTTP method. - Secret key: enter a random string of text with high entropy. This secret key will be hashed using the
SHA256algorithm and added to the payload. - Enable webhook alerts (selected by default): enables a webhook. If deselected, the webhook will be disabled.

Types of webhooks
| Types of webhook | Events |
|---|---|
| Customer | Customer created Customer updated |
Editing a webhook
- Click on the drop-up menu at the bottom left with your name.
- Click on the Webhook Alerts tab on the Settings page.

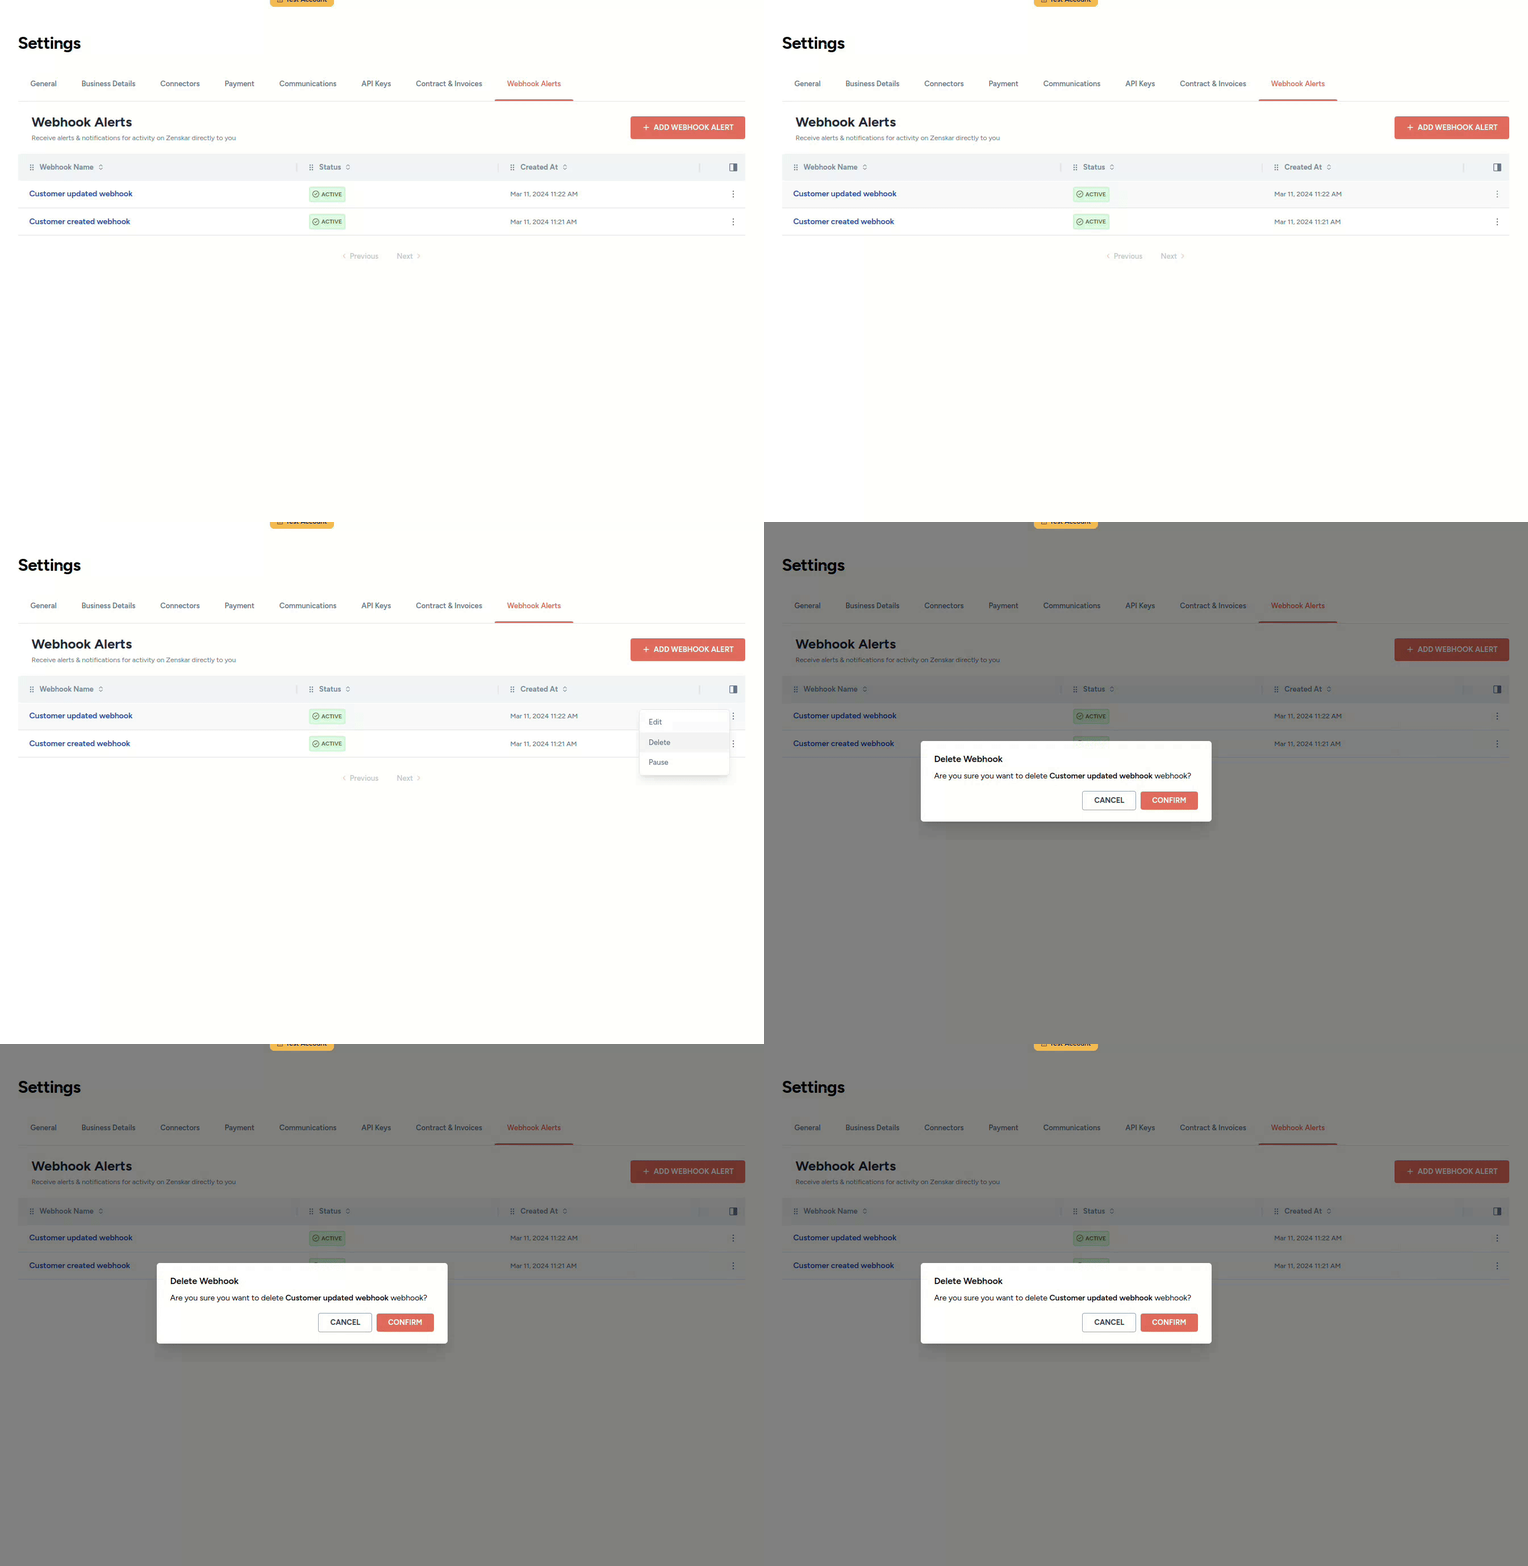
- Click on the kebab menu at the end of the row containing the webhook you wish to edit, and proceed as shown below:

- Make the necessary edits.
- Click on the UPDATE button to persist the changes.
Deleting a webhook
- Click on the drop-up menu at the bottom left with your name.
- Click on the Webhook Alerts tab on the Settings page.
- Click on the kebab menu at the end of the row containing the webhook you wish to delete, and proceed as shown below:

View webhook activity
- Click on the drop-up menu at the bottom left with your name.
- Click on the Webhook Alerts tab on the Settings page.
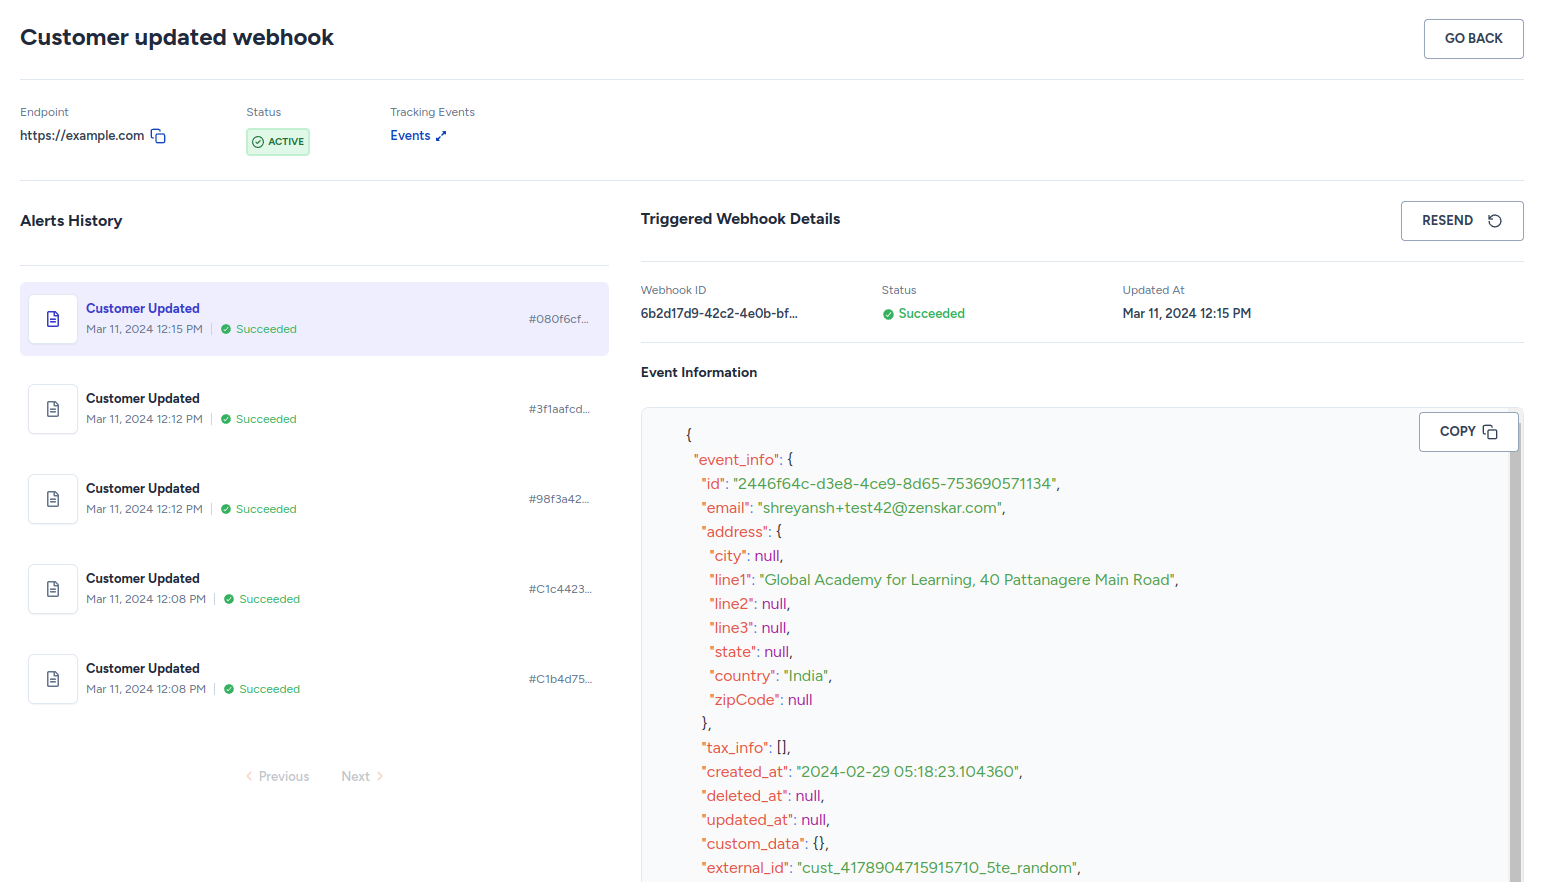
- Click on the row containing the webhook whose details you wish to view.

The Alerts History panel
You can view the history of the webhook alert in the Alerts History panel. In the case of the above figure, the webhook was triggered five times.
Event Information panel
The event payload (JSON format) can be viewed in the Event Information panel:
{
  "event_info": {
    "id": "2446f64c-d3e8-4ce9-8d65-753690571134",
    "email": "[email protected]",
    "address": {
      "city": null,
      "line1": "Global Academy for Learning, 40 Pattanagere Main Road",
      "line2": null,
      "line3": null,
      "state": null,
      "country": "India",
      "zipCode": null
    },
    "tax_info": [],
    "created_at": "2024-02-29 05:18:23.104360",
    "deleted_at": null,
    "updated_at": null,
    "custom_data": {},
    "external_id": "cust_4178904715915710_5te_random",
    "organisation": "888ae523-8878-4ed7-85cc-6c0a54320568",
    "phone_number": "+91 9999999999",
    "customer_name": "Shreyansh",
    "ship_to_address": {
      "city": null,
      "line1": "Global Academy for Learning, 40 Pattanagere Main Road",
      "line2": null,
      "line3": null,
      "state": null,
      "country": "India",
      "zipCode": null
    },
    "auto_charge_enabled": true,
    "communications_enabled": true
  },
  "event_triggered": "customer.updated"
}
Triggered Webhook Details panel
This panel shows the following details:
- Webhook Id: the Zenskar-enerated UUID of the webhook.
- Status: Succeeded or Failed as status.
The status shown in Zenskar is determined by the response received from the endpoint URL shared by you. If the response code is
200, the status is Succeeded, else it is considered Failed. You must configure your system to return a200as response code to Zenskar when a payload from Zenskar is successfully delivered.
Validating webhook deliveries
Zenskar will use the secret key to generate a hash signature. This hash signature will be included in the 'X-Signature' header of each payload.
When validating webhook payloads, several important considerations should be noted:
- Zenskar employs an HMAC hex digest for computing the hash.
- The hash signature always starts with 'sha256='.
- The hash signature is generated using the secret token and the contents of the payload.
You can use your programming language of choice to implement HMAC verification in your code. For example, you can define the following verify_signature function and call it when you receive a webhook payload:
import hashlib
import hmac
def verify_signature(payload_body, secret_token, signature_header):
    """Verify that the payload was sent from GitHub by validating SHA256.

    Raise and return 403 if not authorized.

    Args:
        payload_body: original request body to verify (request.body())
        secret_token: GitHub app webhook token (WEBHOOK_SECRET)
        signature_header: header received from GitHub (x-hub-signature-256)
    """
    if not signature_header:
        raise HTTPException(status_code=403, detail="x-hub-signature-256 header is missing!")
    hash_object = hmac.new(secret_token.encode('utf-8'), msg=payload_body, digestmod=hashlib.sha256)
    expected_signature = "sha256=" + hash_object.hexdigest()
    if not hmac.compare_digest(expected_signature, signature_header):
        raise HTTPException(status_code=403, detail="Request signatures didn't match!")
Updated about 2 months ago
