

Prerequisites
Zenskar uses token-based authentication (TBA) to connect to a NetSuite account. Enable a few features in NetSuite before you connect Zenskar to NetSuite.Enable features
- On the NetSuite dashboard, go to Setup > Company > Enable Features.
- On the horizontal menu, go to SuiteCloud. Go to the SuiteTalk (Web Services) subsection. Select REST WEB SERVICES. See NetSuite’s Prerequisites and Setup for REST Web Services.
- Go to the Manage Authentication subsection. Select TOKEN-BASED AUTHENTICATION.
- Save the changes.
Create an integration record
- Create a new integration to handle all requests from Zenskar. To create it, go to Setup > Integration > Manage Integrations > New. See NetSuite’s Creating an Integration Record.
- Give the integration a name. Leave its state as Enabled. Enable Token-Based Authentication on it.
- Save the integration. NetSuite displays the Consumer Key and Consumer Secret once, at creation time. Copy both immediately.
NetSuite only shows the Consumer Secret and Token Secret at creation time. If either is lost, re-issue the integration or the token rather than searching for it.
Grant permissions
Before you issue an access token, confirm the user’s role has Web Services access. Also confirm the role has the permissions below. See NetSuite’s Roles and Permission Considerations for APIs. Grant the role used for this connection the following permissions:Set Accounts to Full only if Zenskar should auto-create ledger accounts during journal entry sync. Otherwise View is enough.
Issue an access token
- From the NetSuite homepage, go to Settings > Manage Access Tokens. Choose the integration you created, the user, and a token name. NetSuite displays the Token ID and Token Secret once. Copy both immediately. See NetSuite’s User Access Token, Create a TBA Token.
- Note the Account ID and Company URL, both under Setup > Company > Company Information. The Company URL is under the Company URLs subtab. Use the entry for SUITETALK (SOAP AND REST WEB SERVICES).
Connect NetSuite
-
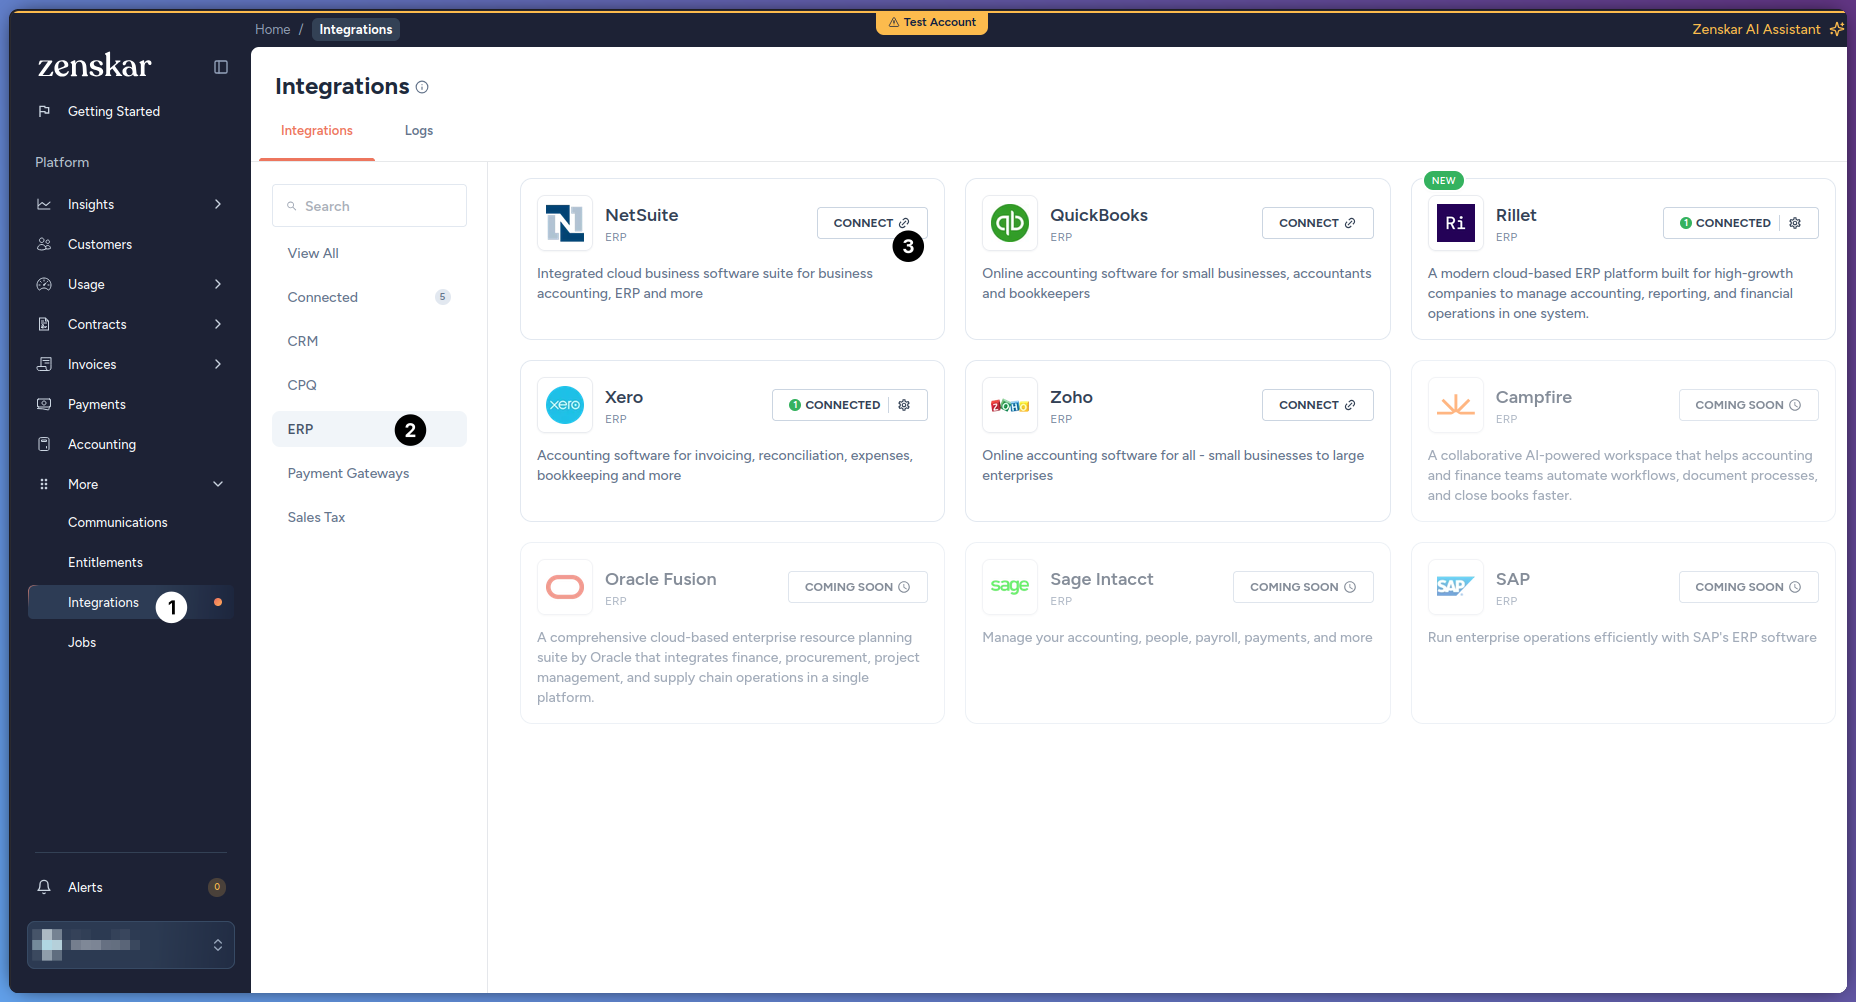
Go to More > Integrations > ERP, find the NetSuite card, and click Connect.
-
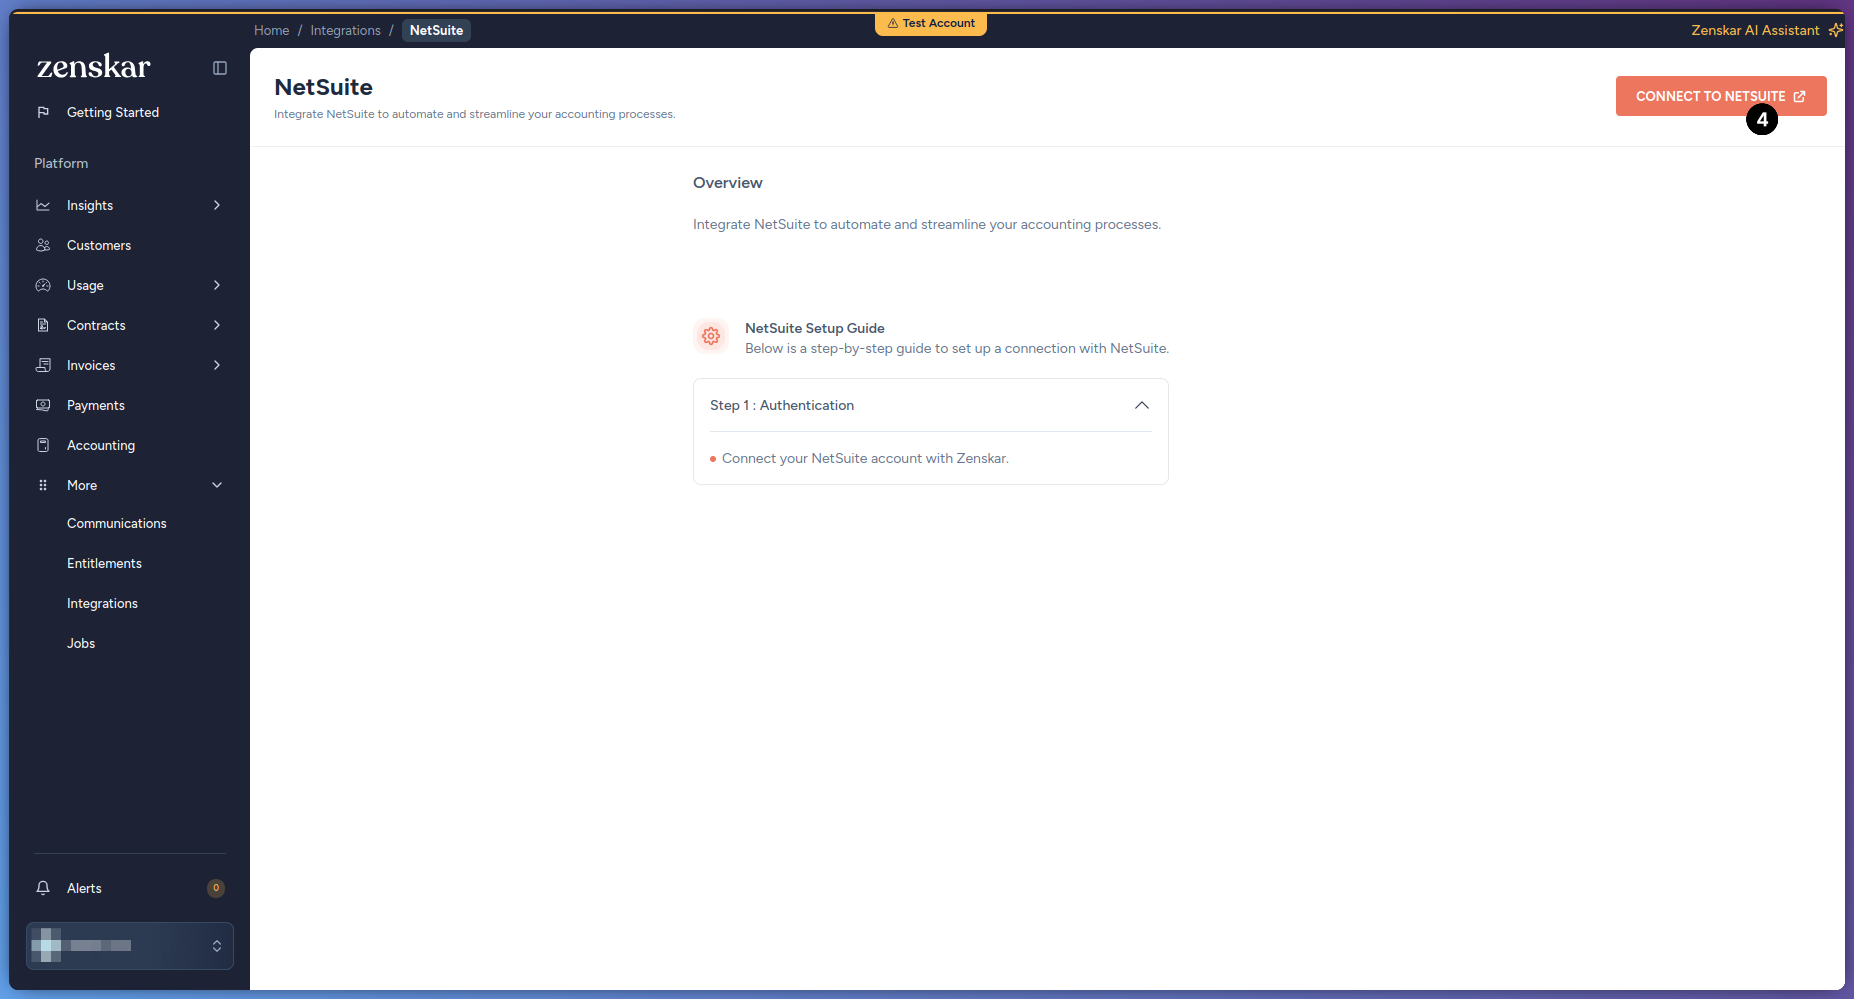
On the NetSuite page, click Connect to NetSuite.
-
In the dialog, enter the six values gathered in Prerequisites. Click Connect:
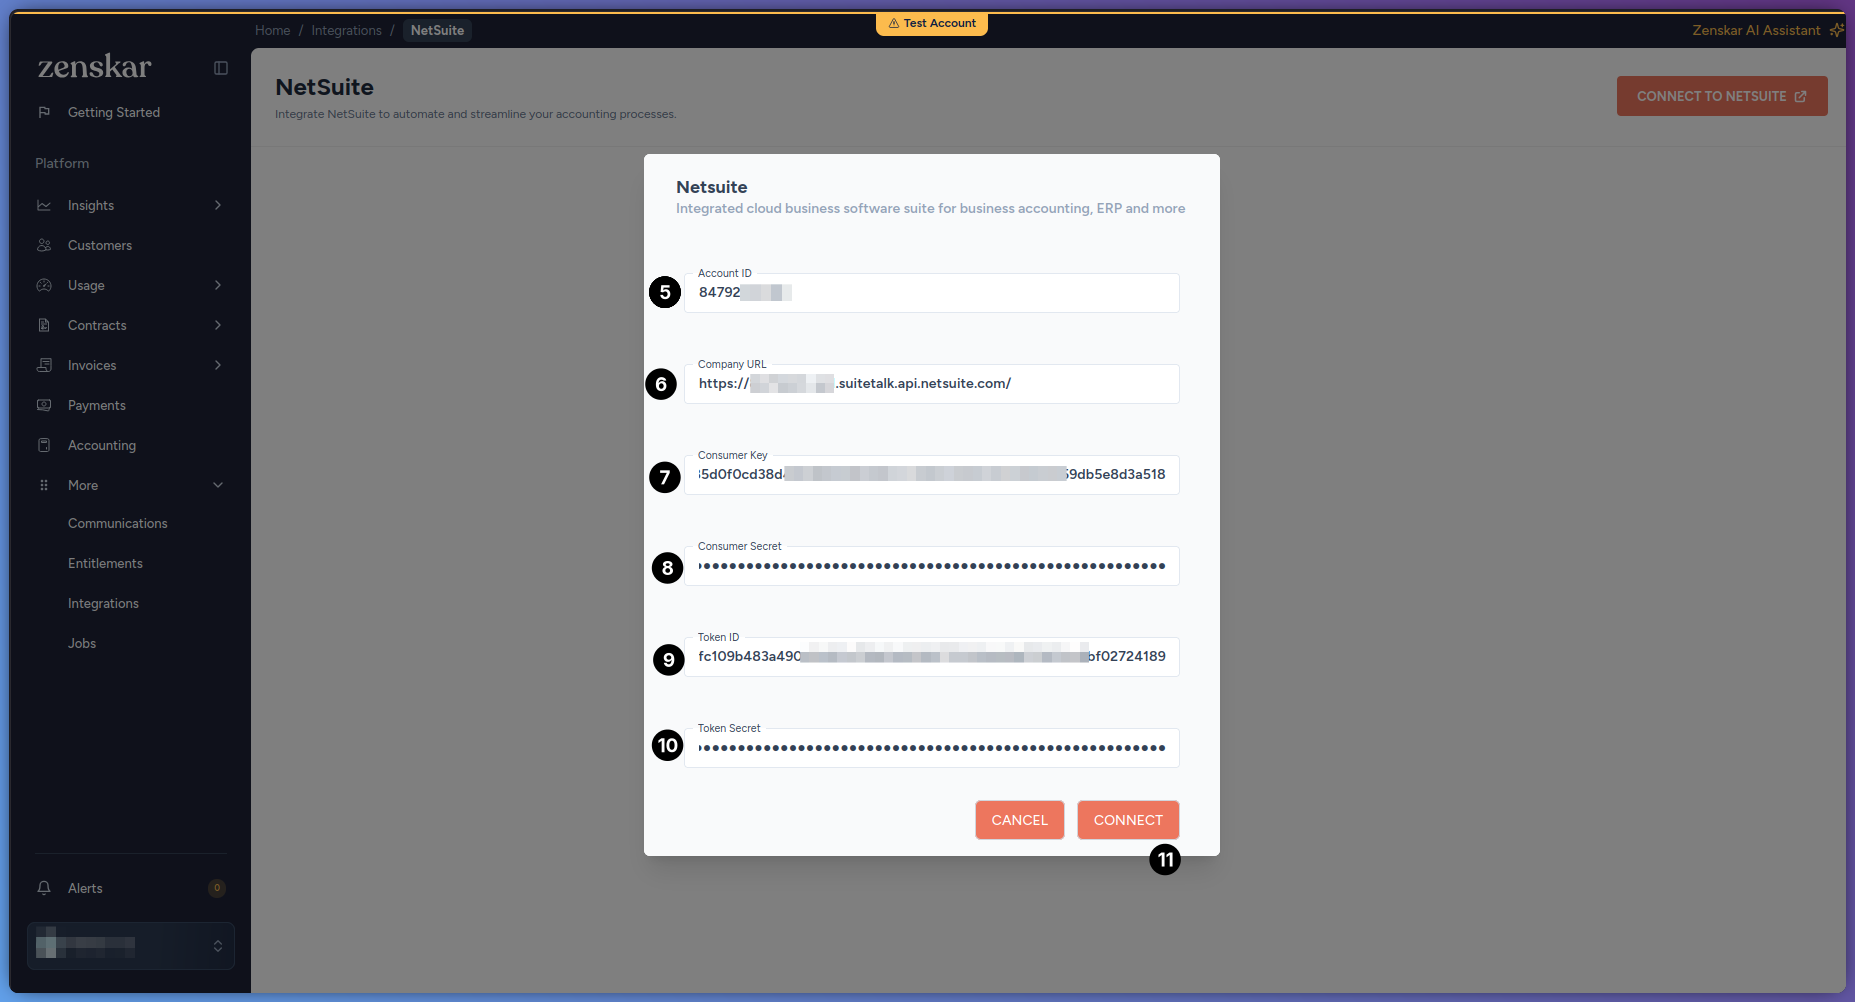 Zenskar sends a live request to NetSuite using these values. NetSuite can reject this request for several reasons, including a Company URL whose account ID does not match the Account ID field. Zenskar does not distinguish between these causes. The connection fails with the same generic error regardless of the cause.
- Zenskar redirects you to the Configuration screen.
Configure the connection
- Under Entity Sync Mapping, select the subsidiary from the NetSuite Entity dropdown. Map it to the corresponding Zenskar Entity. Both fields are required.
-
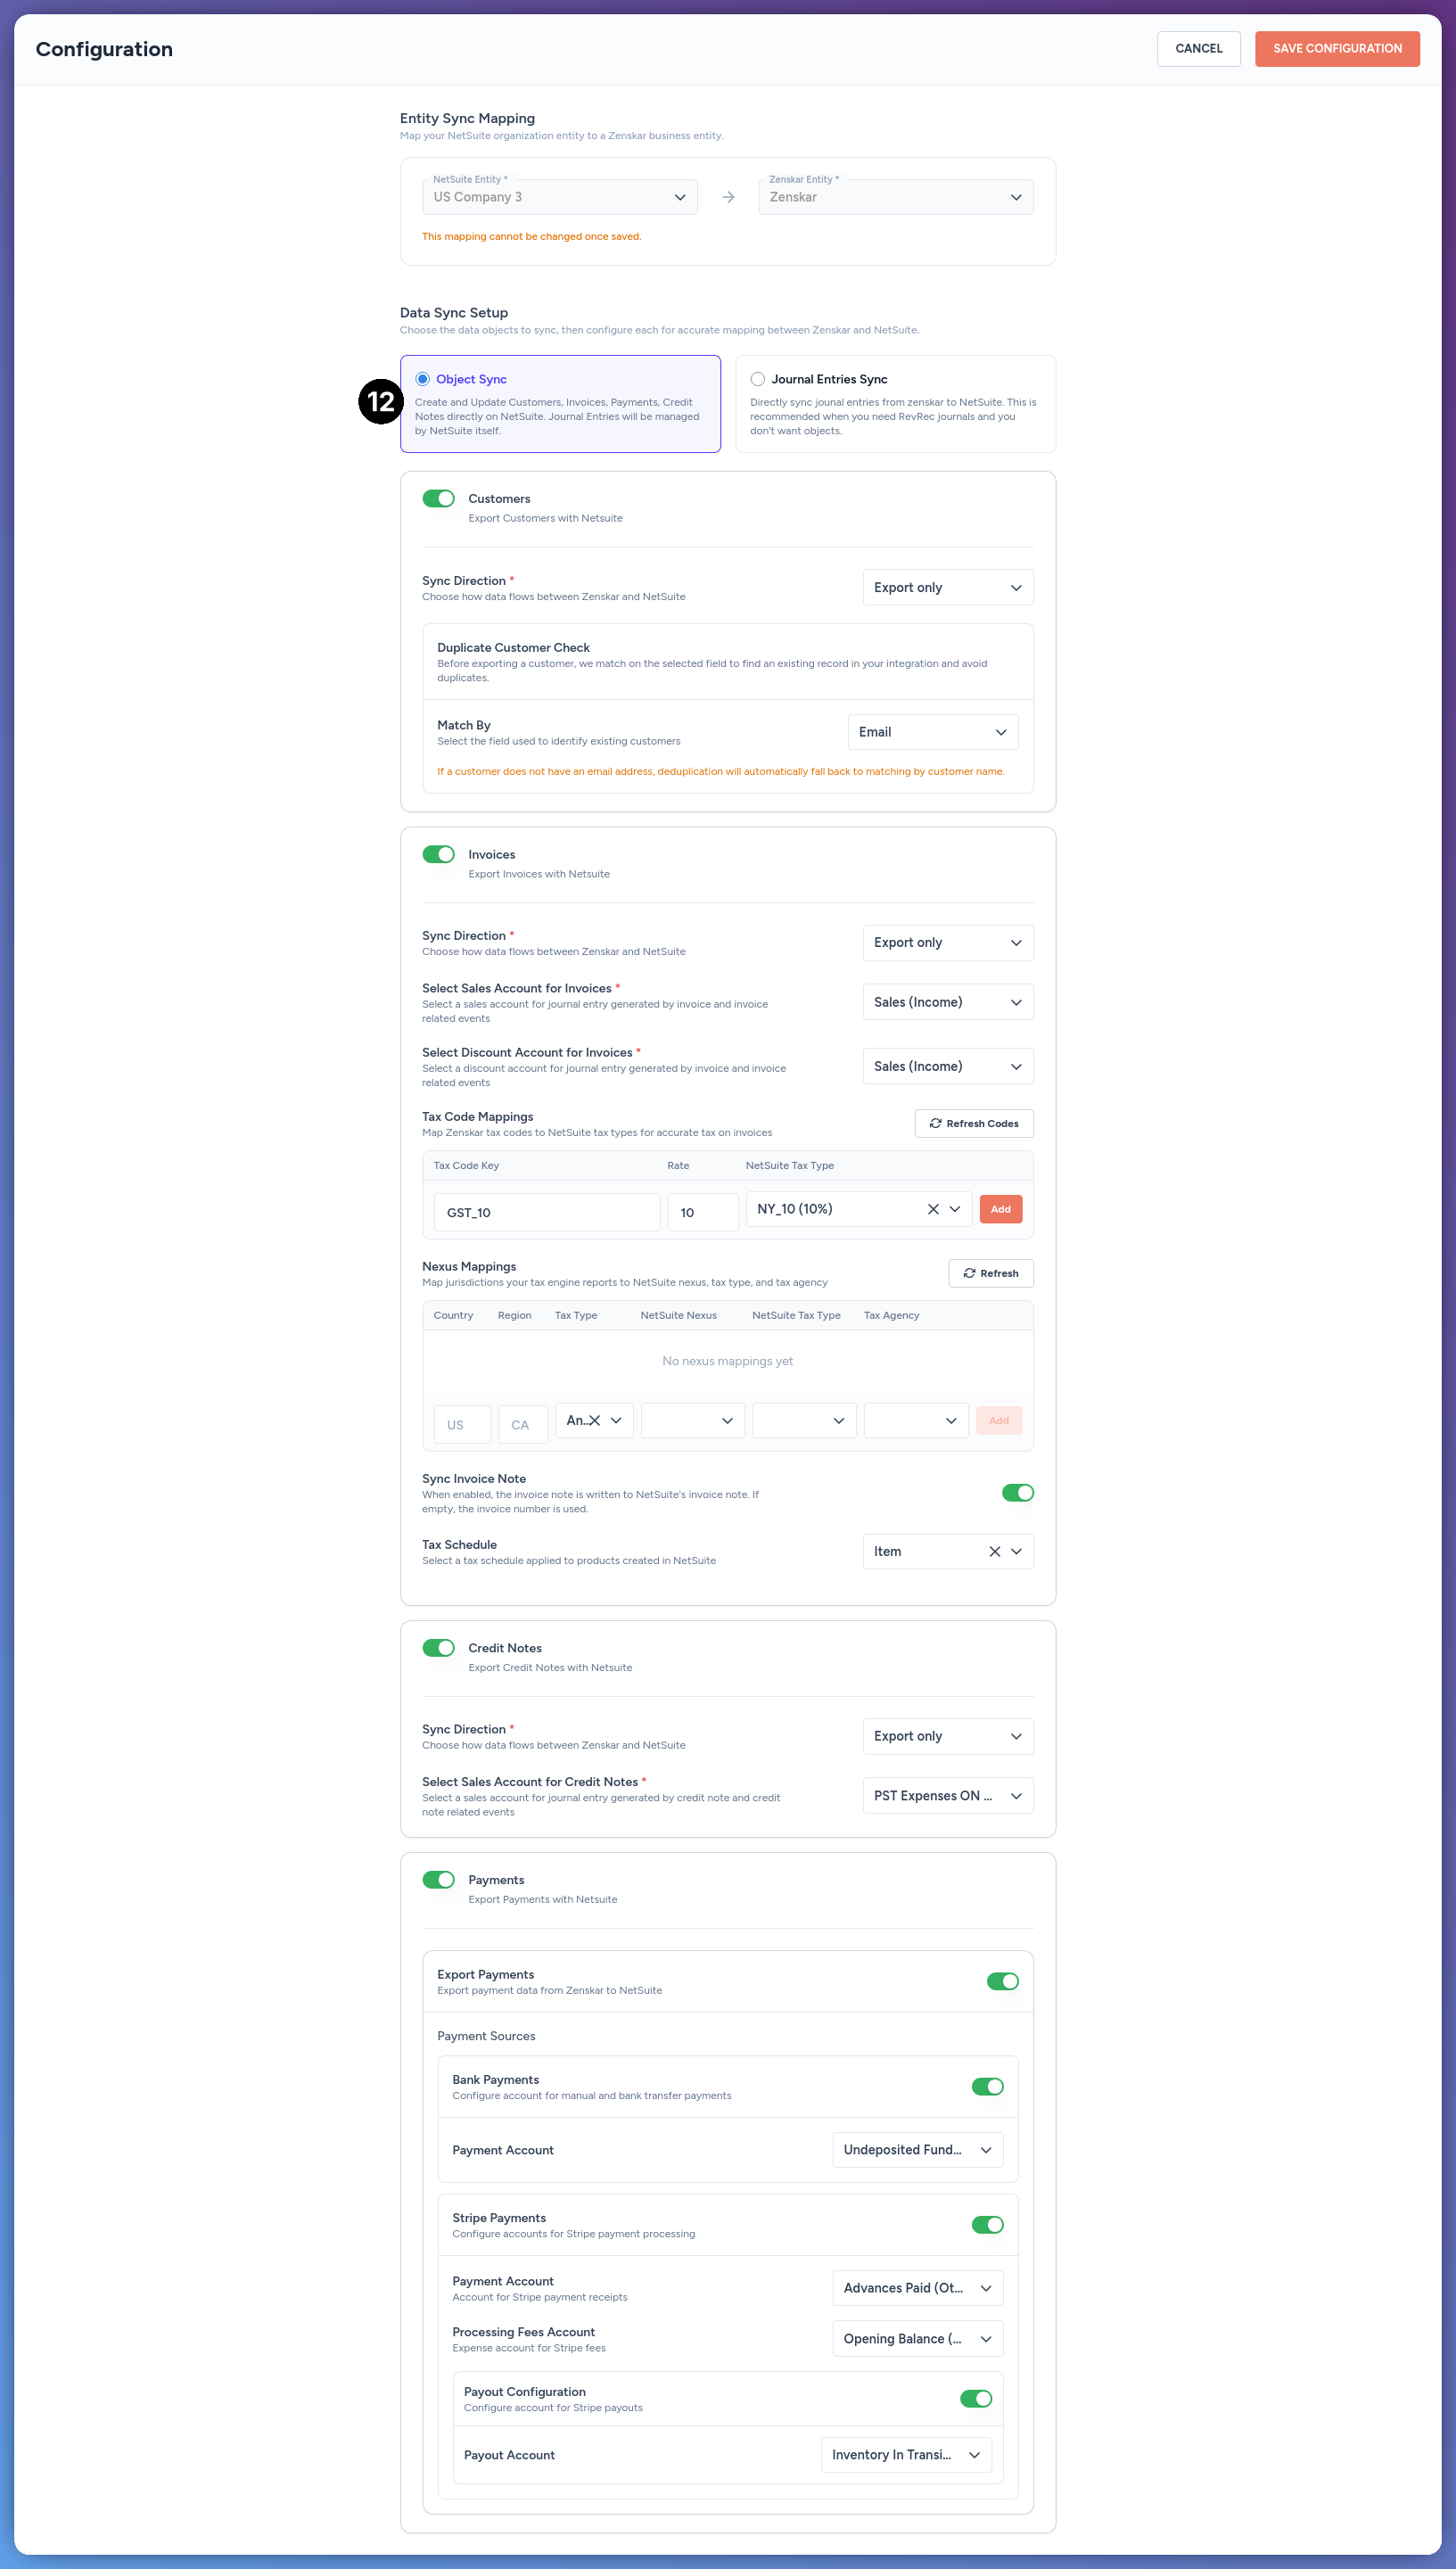
Under Data Sync Setup, choose a sync mode. Only one mode can be active per connection:
Switching from one mode to the other clears the configuration already set under the mode you are leaving.
If you choose Object Sync
Customers
Turn on Customers. Then choose a Sync Direction. Below Sync Direction, a Duplicate Customer Check card appears. Before exporting a customer, Zenskar matches it against the selected field to find an existing NetSuite record. This avoids creating duplicate customers. This matching is always on. You cannot disable it. The connector always applies a default match field, even if you do not pick one. Pick a field from Match By > Select Field. Zenskar pre-fills this with your saved choice. If you have no saved choice, it uses NetSuite’s default match field, Email. If Email is unavailable, it uses the first available option. If you leave this field untouched, Zenskar still relies on NetSuite’s default behavior.If you select Email as the match field, deduplication automatically falls back to matching by customer name for any customer without an email address.
Invoices
Turn on Invoices. Choose a Sync Direction. Configure the invoice field mapping:Zenskar does not restrict these fields to a particular NetSuite account type. Any active account for the subsidiary is selectable. As general guidance, map Sales Account for Invoices to an Income account, and Discount Account for Invoices to an Income or contra-revenue account used for discounts. Confirm the right type with your NetSuite administrator.
The Tax Schedule dropdown only appears for connectors whose Zenskar integration supports tax schedules. Zenskar shows a loading state while it fetches the available schedules from NetSuite. If NetSuite has no tax schedules configured, Zenskar asks you to create one in NetSuite and refresh the page. If the fetch fails, Zenskar shows an error with an option to retry. If NetSuite later removes a previously selected schedule, Zenskar clears the saved selection. Zenskar then prompts you to re-select one.
Under Custom fields, map Zenskar values into NetSuite custom fields. A separate card appears per NetSuite record type: Customer, Invoice body, Line items, and Contract. Click Add Custom Field. Search for and select a NetSuite custom field. Then configure:
NetSuite segments like Location, Department, and Class are configured as ordinary custom fields. There is no separate section for them. Custom fields are available today at the invoice header level. Line-level custom fields are not yet available.
Credit Notes
Turn on Credit Notes. Choose a Sync Direction. Map a Sales Account for Credit Notes. This account is required. Credit notes must carry line items. A lump-sum credit note is rejected.Map Sales Account for Credit Notes to the same account, or the same account type, as Sales Account for Invoices. NetSuite does not enforce this, but a mismatch can misstate revenue in your reports.
Payments
Turn on Payments. Then turn on Export Payments. At least one payment source must be enabled. Otherwise, Zenskar blocks saving:If you choose Journal Entries Sync
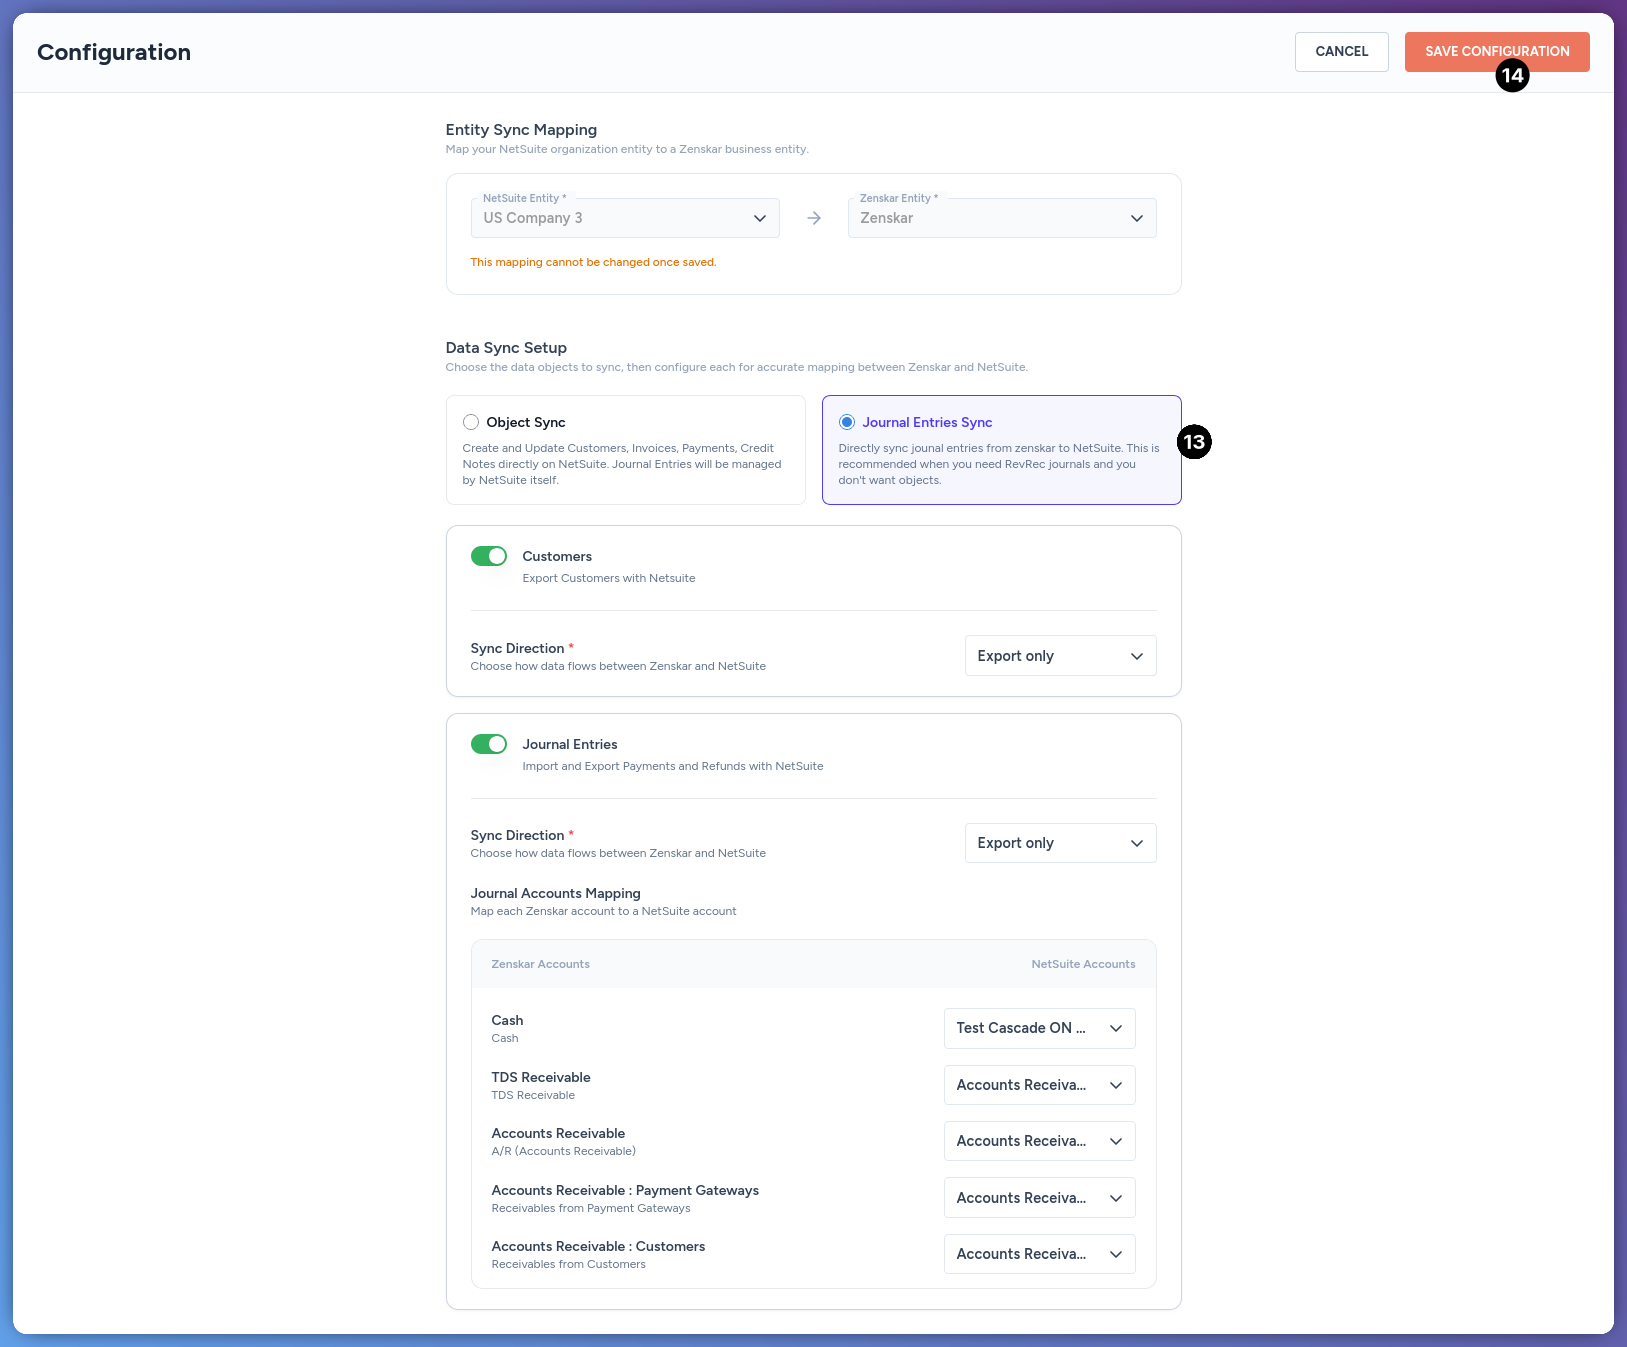 Turn on Journal Entries. Choose a Sync Direction. Map each account under Journal Accounts Mapping to a NetSuite account. NetSuite filters the account options to the connection’s subsidiary.
The accounts listed on the Zenskar side come from your own Settings > Accounting > Chart of Accounts. They do not come from NetSuite. Add, rename, or remove an account there to change what appears here. None of these have a default NetSuite account mapped to them.
If a journal entry line references a NetSuite account that does not exist yet, Zenskar can create it automatically. Zenskar only creates accounts within a fixed set of types that NetSuite allows, for example Bank, Income, Expense, Deferred Revenue, Accounts Receivable, and Accounts Payable. The connector enforces this restriction. Zenskar has no setting to view or change the allowed types.
Features
Reference
Known limitations
- A journal entry referencing a missing NetSuite account can only auto-create that account if its type is in NetSuite’s allowed set. Any other account type must already exist in NetSuite.
- A credit note syncs to NetSuite as a Credit Memo. It must carry line items. A lump-sum credit note is rejected.
- Payments and refunds are not de-duplicated. Re-running a payment or refund sync can create a duplicate record in NetSuite.
- A customer’s transacting currency must already be enabled on the NetSuite customer record. Otherwise, invoice creation fails.
- NetSuite has no standalone address or contact record. Address and contact details are embedded on the customer only.
- Line-level custom fields are not available. Custom field mapping applies at the invoice header level only.
- By default, Zenskar writes NetSuite’s system Transaction ID as the invoice number. To write the human-facing Document Number instead, enable NetSuite’s “Allow Override” setting for auto-generated numbers. Without this setting, the sync is rejected.